Ho iniziato da qualche anno a decorare magliette per i miei bimbi usando varie tecniche ma soprattutto creando piccoli ricami e da allora non ho mai smesso! Piú i bambini crescono, piú fatico a trovare nei negozi top e magliette nello stile che amiamo. Per Leonardo che ha 4 anni trovo ancora parecchie cose carine, ma per Adele che avrá 7 anni ad Ottobre si fatica molto di piú.. per cui son corsa ai ripari e ho iniziato a prendere magliette tinta unita e con pochi materiali e, tuttosommato nemmeno troppo tempo, le ho rese un pó piu carine e sicuramente uniche.
Questa qui sotto é l'ultima creata, quasi identica a una fatta l'anno scorso a dire il vero (la si puó vedere a fine post), ma con bambini che crescono come funghi é un peccato usarle solo per una stagione estiva quindi ho variato molto leggermente il design e ne ho ricamata un'altra per questa estate.
***
I started decorating tops and t-shirts for my children a couple of years ago and haven't stopped ever since. I have been using different techniques but mostly lots of little cute hand embroideries! The older the children get the more difficult it becomes for me to find cute clothes in the style we love. I can still find nice things for Leonardo who is 4, but for Adele, who is going to be 7 in October, I have been struggling.. so I decided to solve the issue myself, buying some plain t shirts and with very few materials, and not that much time invested, I managed to create some cute and completely unique tops.
This down here is the last one I made, it's actually almost identical to one I had designed and made last year as, with children growing so fast, it's such a shame to use clothes only for one single summer season. So I slightly modified the design and some of the colours and I made a new one for this summer.

Quello di oggi piú che un tutorial (non ho proprio le competenze per insegnare in questo ambito!) é una semplice condivisione di come faccio io e che materiali uso (domanda che mi viene fatta molto spesso su Instagram).
I materiali che uso sono questi:
- una maglietta tinta unita
- un telaietto da ricamo il piú piccolo possibile (per evitare di sprecare troppa carta stabilizzatrice, poi spiegheró il perché).. io ne uso uno da 10 cm ma quasi quasi lo vorrei un pó piú piccolo.
- fili da ricamo
- ago da ricamo
- forbici
- tela stabilizzatrice per ricami (ne parlo piú sotto!)
***
What I am writing in today's post is not a real tutorial (I don't have enough competence and enough experience in this subject to be able to teach something really!) but it's simply me sharing with you how I usually do this and what materials I use (as this is a question that I am often asked on Instagram).
The materials I use are the following:
- a plain t-shirt
- a small embroidery hoop (the smaller you can get as that will save you some stabiliser as I'll show you later, mine is 10 cm but I am thinking of getting a slightly smaller one)
- embroidery floss
- embroidery needle
- scissors
- stabiliser for embroidery (more on this later in the post!)

Per ricamare su una maglietta in linea generale direi che serve un qualcosa per trasferire il disegno e un altro qualcosa per stabilizzare il tessuto (essendo la maglina molto elastica).. penso ci siano molti modi per ottenere queste due cose e molti materiali adatti a questi scopi ma io personalmente mi trovo benissimo con questa teletta che mi risolve entrambe le problematiche in un colpo solo.
E' la Sulky Sticky Fabri-Solvy ed é una teletta stabilizzatrice adesiva su cui si puó trasferire il disegno e si scioglie con acqua a a fine lavoro.
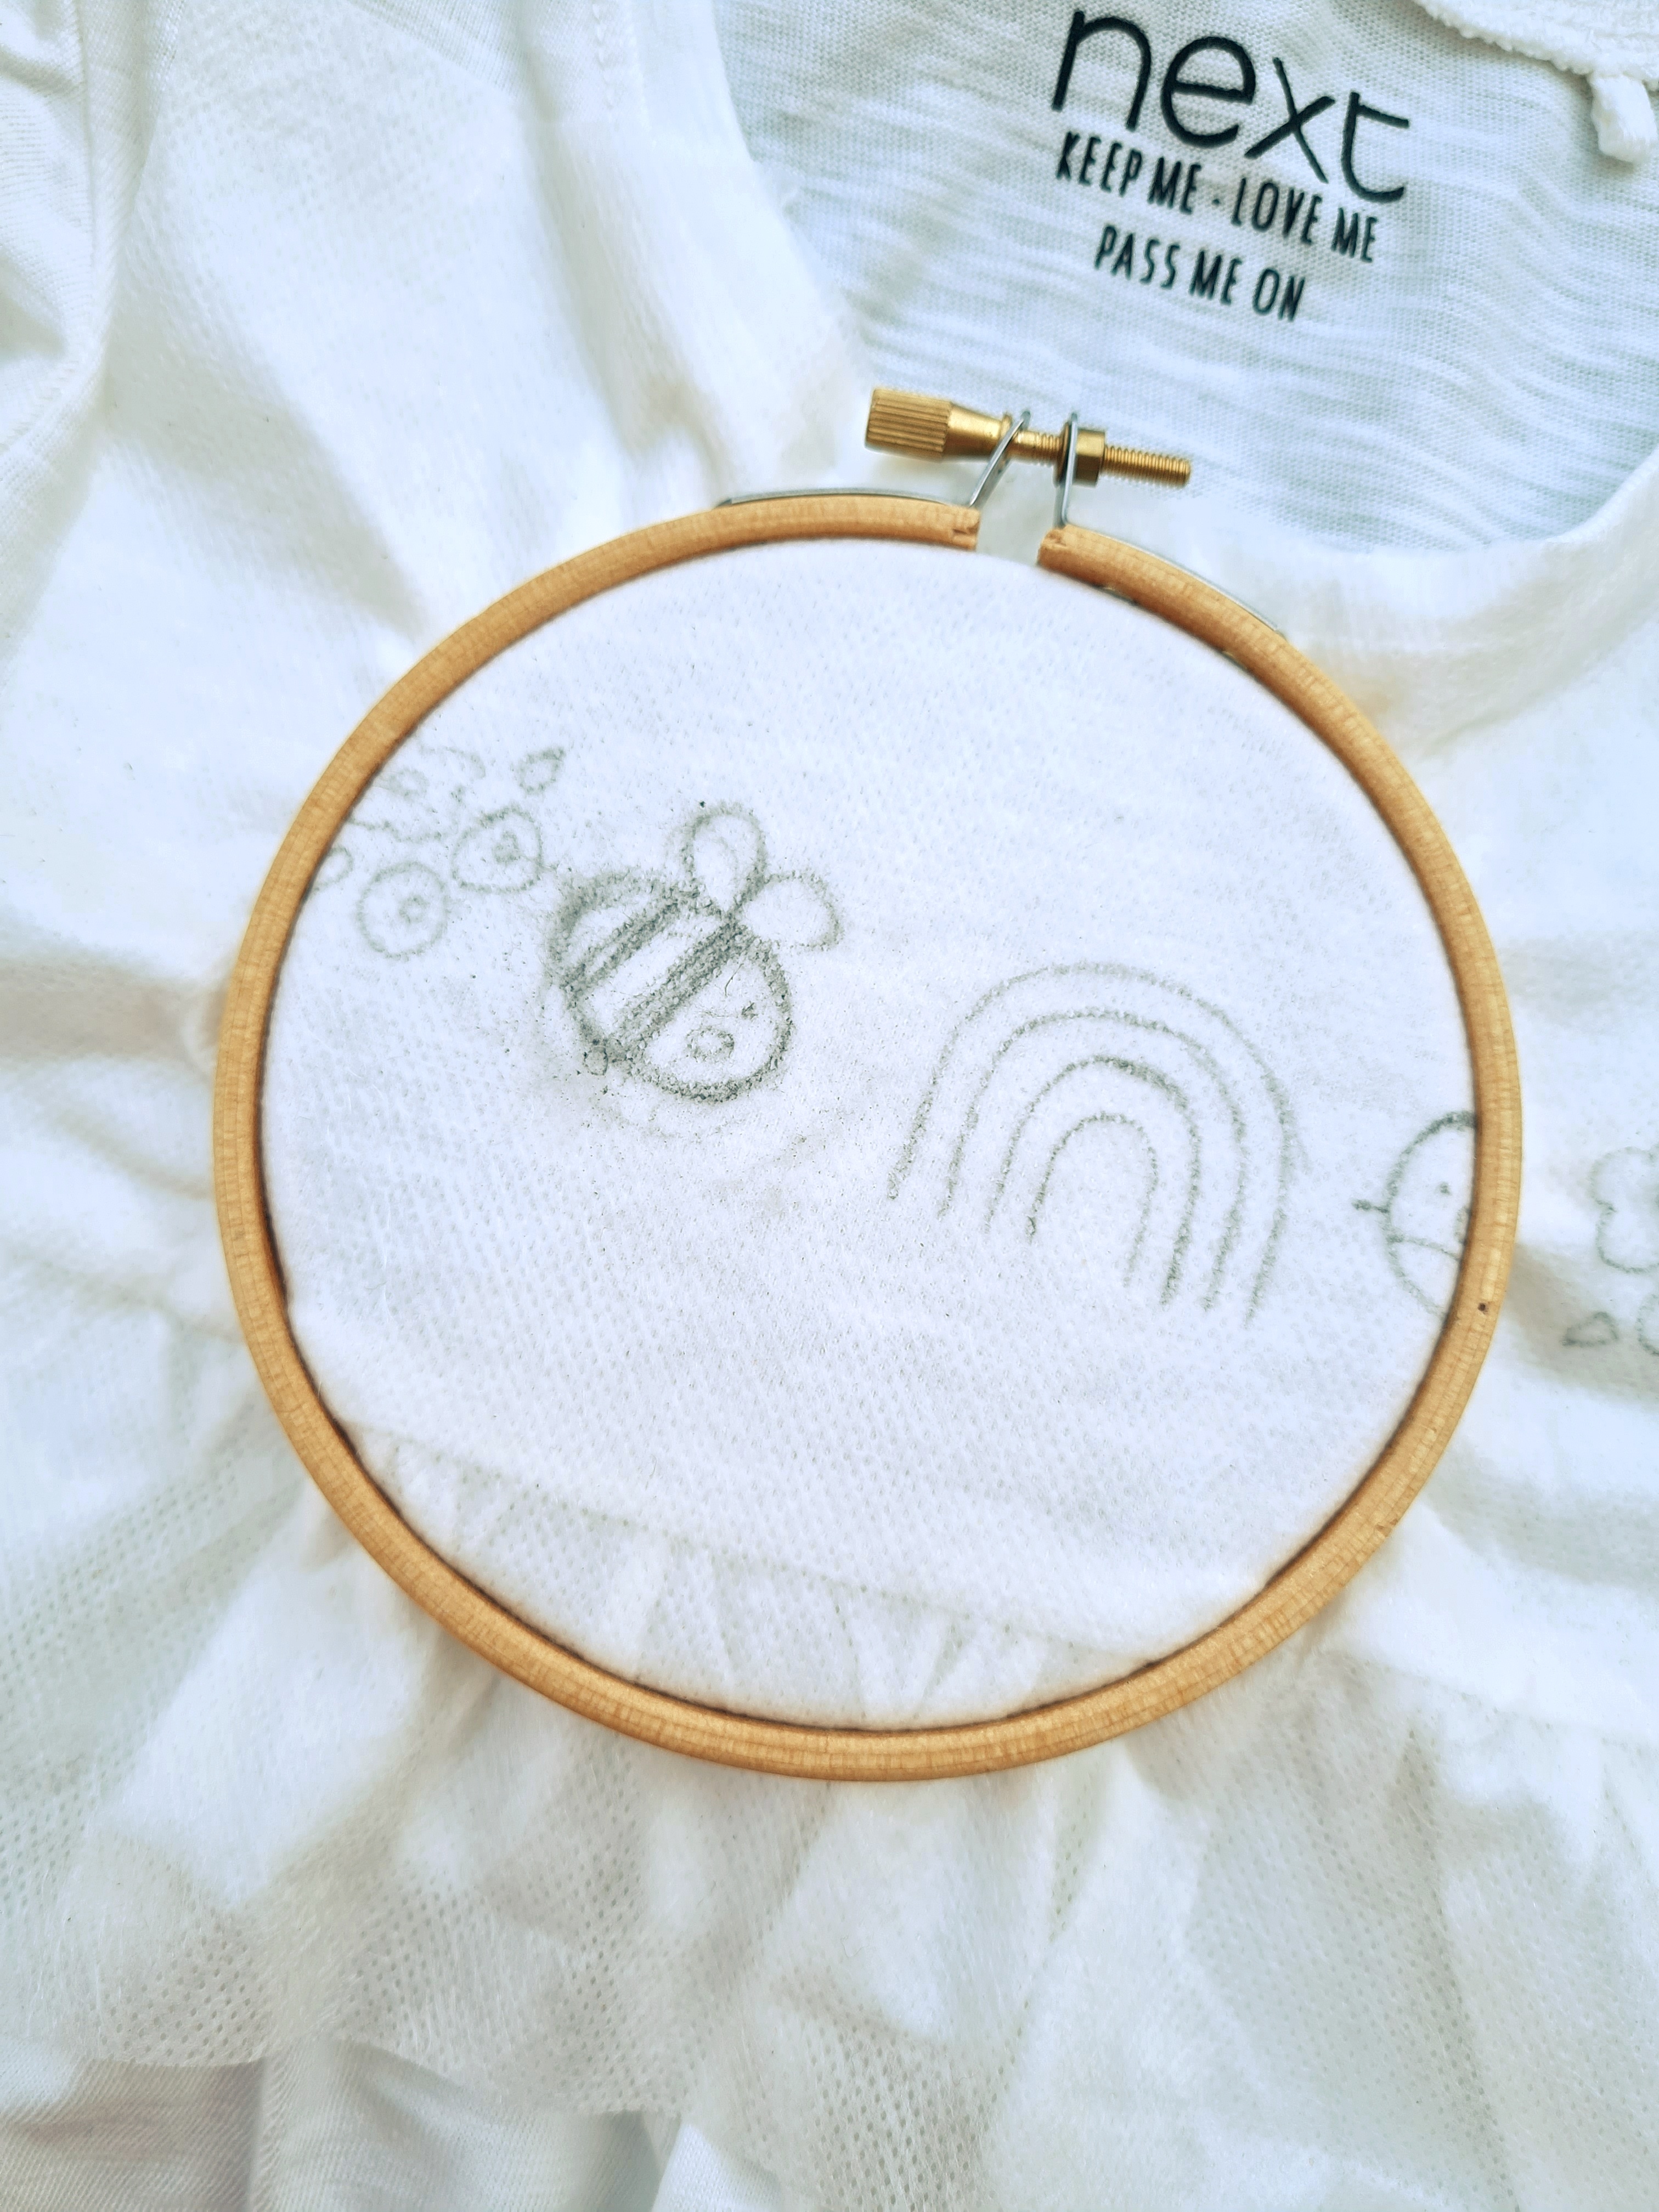
Il primo passaggio é quindi riportare il disegno che si vuole ricamare sulla tela stabilizzatrice. E' abbastanza trasparente quindi si puó facilmente ricalcare il disegno ma volendo questa carta é anche stampabile con una stampante. Per questo passaggio é molto importante (in particolare se si sta usando un materiale elastico come appunto la maglina delle t-shirts) che il pezzo di teletta stabilizzatrice sia grande abbastanza per contenere tutto il disegno ma anche tutto il contorno del telaio (con anche un pó di margine intorno) in tutte le posizioni in cui dovremo spostarlo per ricamare tutto il disegno (nel caso il disegno sia piú grande del telaio, naturalmente, come in questo caso). Questo perché é importante che la stoffa della t-shirt che viene bloccata nel telaio sia tutta sempre rivestita di teletta rinforzante per evitare troppe distorsioni.
***
To hand embroider a t-shirt, you usually need something to transfer the design and something to stabilise the fabric (especially since t-shirts are made of knitted/jersey fabric which is very elastic). There surely are many ways and materials you can use to accomplish those tasks but personally I love using this specific stabiliser as it tackles both issues at the same time.
It's called Sulky Sticky Fabri-Solvy and it's an adhesive stabiliser that can be used to also transfer the design and that dissolves in water after use.
The first step is transferring the chosen design onto the stabiliser. This material is quite transparent so it's easy to copy the design on it but it can also be used with a computer printer. For this step it's very important to cut a piece of stabiliser large enough to contain not only the design but also the whole hoop (with some allowance all around) in all the positions we will have to place it to cover all of the design area while we embroider (of course that is if the design is larger than the hoop, like in my case). This is because it's quite important that the t-shirt fabric fitted inside the hoop is at any time covered with the stabiliser to avoid fabric stretching.

Poi pieghiamo a metá la maglietta e la stiriamo per creare una piega centrale che ci aiuterá a centrare il disegno.
***
The next step is folding the t shirt in half and iron it to create a crease in the midline that will help us to centre the design.

Quindi si attaccherá il pezzo di teletta stabilizzatrice, su cui abbiamo riportato il disegno, sulla maglietta, aiutandosi con la piega creata nel passaggio precedente, per centrare il motivo.
Se la zona da ricamare é vicina al collo come nel mio caso, possiamo anche tagliare via l'eccesso di carta termoadesiva che rimane in quella zona.
***
We can now stick the stabiliser piece where we transferred the design onto the t-shirt, using the central crease we've just created as a reference for the placement.
If the area we are going to embroider is next to the neckline we can cut the excess of stabiliser away from that area.

Poi, iniziando da dove si preferisce, inseriamo il telaio ricordandoci di rimanere sempre all'interno della zona coperta dalla tela stabilizzatrice. Non tirare troppo la stoffa nel telaio perché anche con la tela stabilizzatrice, rimarrá comunque elastica e se troppo tesa, una volta finito il ricamo si vedranno delle zone con arricciature.
***
Then, starting from one area of the design, we will hoop the t-shirt fabric making sure all the area inside the hoop is covered with the stabiliser. It's important not to stretch the fabric too much in the hoop as, even with the stabiliser, the knitted material will easily over stretch and that may result in wrinkles around the embroideries.
Sceglieremo i colori e inizieremo a ricamare! ..non sono esperta in materia e non so dare consigli su tecniche e nomi dei punti ma su internet ci sono infiniti video e tutorial!
***
We'll choose the floss colours and begin embroidering! ..I am unfortunately not a very skilled embroiderer so can't advise on stitches names and techniques but there are plenty of videos and tutorials on the web!

Se il disegno é piú grande del telaio, come nel mio caso, ci sposteremo lungo il disegno con il telaio man mano che finiamo di ricamare una zona.
***
If the design is larger than the hoop, like in my case, we'll move along the design with the hoop every time we finish to embroider a specific area.

A lavoro finito possiamo tagliare via tutto l'eccesso di tela stabilizzatrice lasciando solo quella piú vicina al ricamo.
***
At the end we can cut away most of the excess stabiliser and leave only the bits next to the embroidery.

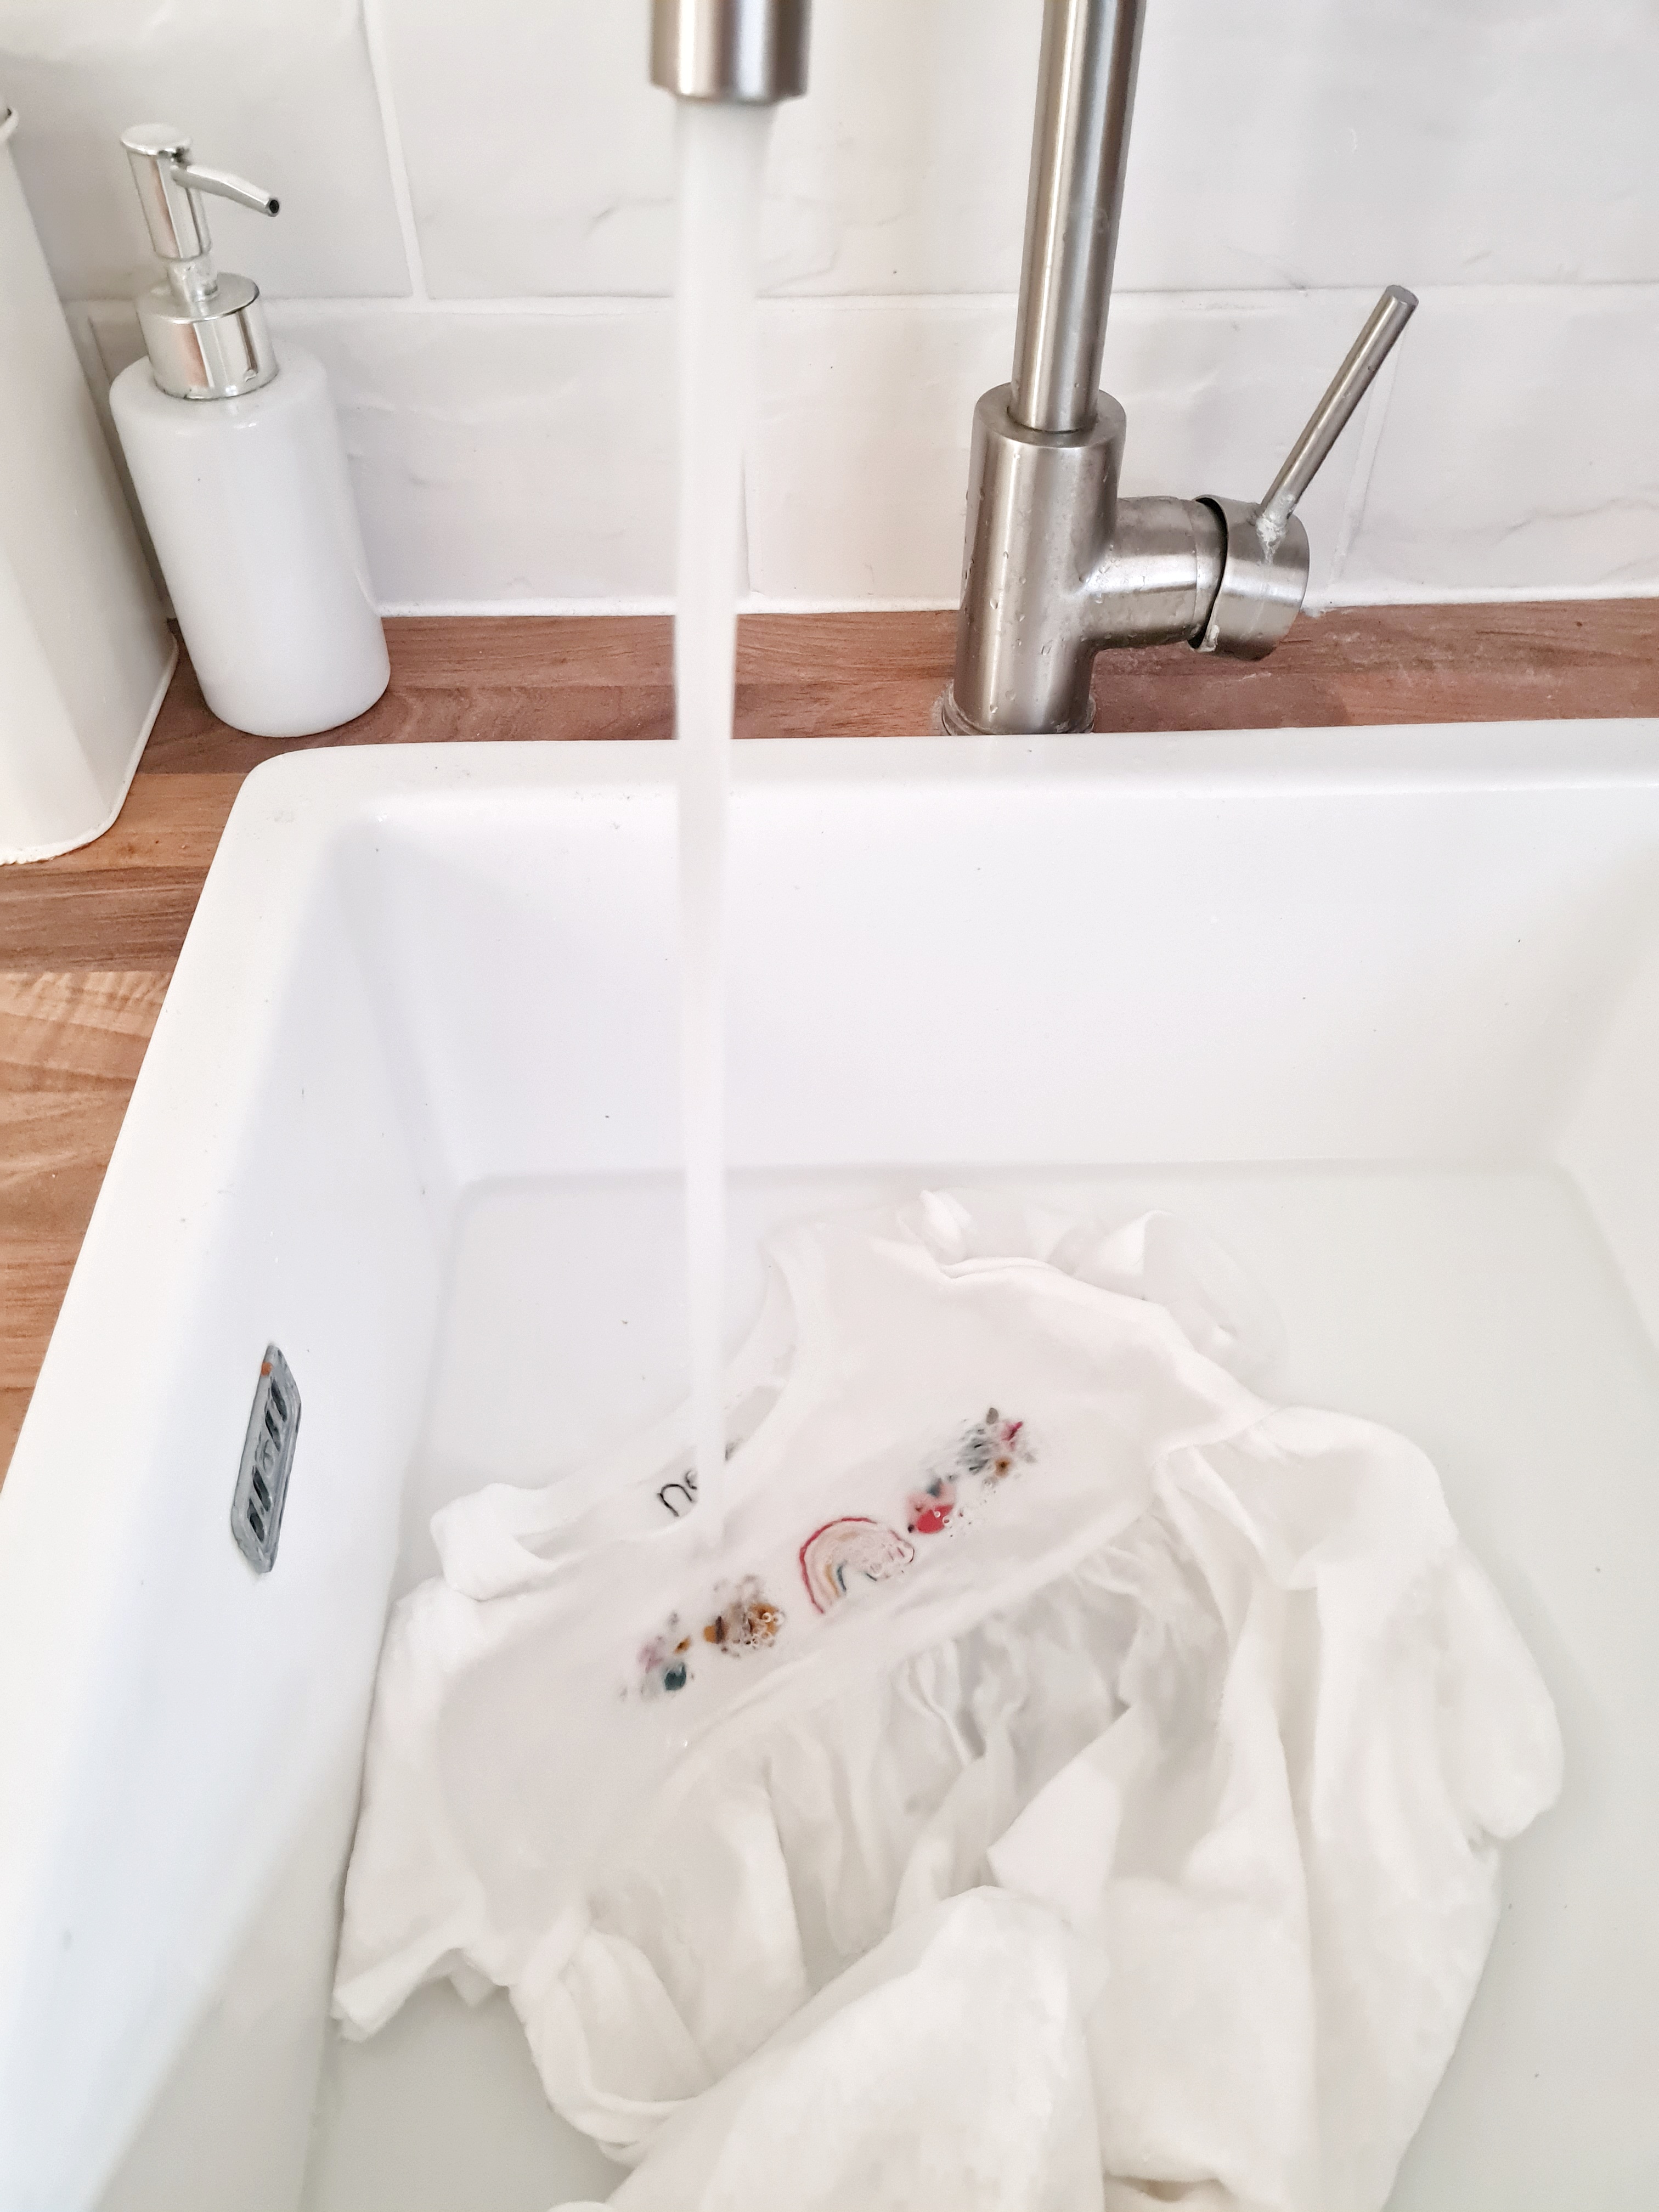
Infine, seguendo le istruzioni della tela stabilizzatrice, una bella sciacquata con acqua nel lavandino fino a che tutta la carta adesiva si sará sciolta nell'acqua...
***
We'll then follow the instructions of the stabiliser and dissolve it in water with a good rinse...
Ed ecco la maglietta lavata, asciugata, stirata e pronta per essere indossata e molto molto amata!
***
And here is the t-shirt after being washed, dried, ironed.. all ready to be worn and loved!

..e per finire il post ecco una carrellata di un pó di magliette (e un vestito) decorate negli ultimi due anni.. come detto sopra non sono una provetta ricamatrice, non conosco i nomi dei punti e spesso mi invento io come farli, ma mi piace tanto creare i disegnetti e scegliere i colori.. e per fortuna l'effetto finale, anche se i punti sono molto alla buona, é comunque, secondo me, tanto carino :)
***
...and finally a roundup of a few t-shirts (and a dress) I decorated during these past two years.. as I mentioned above I am not a very skilled embroiderer, I don't know the stitches names and I often improvise without following any specific technique, but I love designing those cute motives so much and choosing the colours... and I think the end result, even with some very random stitches, is luckily still quite cute :)


love
Federica xx
Comments